Foreword
This is by no means an exhaustive Squad guide, merely a compendium of general game sense tips directed to an inexperienced Squad infantry player wanting to improve. I tried to keep it as brief and general as possible (I seem to have failed). Most of the information on here was gathered through my personal experience and close observation of some good Squad players over the years. For the experienced players choosing to read through this, I hope some of the arguments and statements in here make you reflect about the game; I would love to hear about the different aspects of the guide you agree/disagree with, and if you persuade me I will definitely update the information into the guide.
My personal opinions are peppered all over the document, I am not telling you that this is the only way to play the game. The tips and arguments presented in this guide are what has worked for me and other players I have played with, and it could be possible that they don’t work for you. As per the OWI Code of Conduct, “there is no wrong way to play the game, there are only effective and ineffective tactics”, therefore take this guide as a suggestion!
Special thanks to Ol’ Jim (for helping provide and create clips) and various other members of the Squad community (notably Drizzle and Vex) for providing insights and second opinions on the contents of this document.
Enjoy!
N.B: Information in this guide is valid as of V3.0.1. I am always looking to update and add new clips (trying to use clips from v3.0 only) to this document. If you got anything, message me on discord: koodoo#9184
Table of Contents
Click here to access the guide on Google Docs, be aware it could be outdated.
I) The Player
Settings
FOV: For squad, I have found lower FOV (90-95) works best to have a bigger image of long-range targets. I use 90 FOV.
Sensitivity: Pretty standard concept for all FPS games, I reccomend to have a glance at Juho’s Guide for Accurate Shooting and generic FPS sensitivity videos.
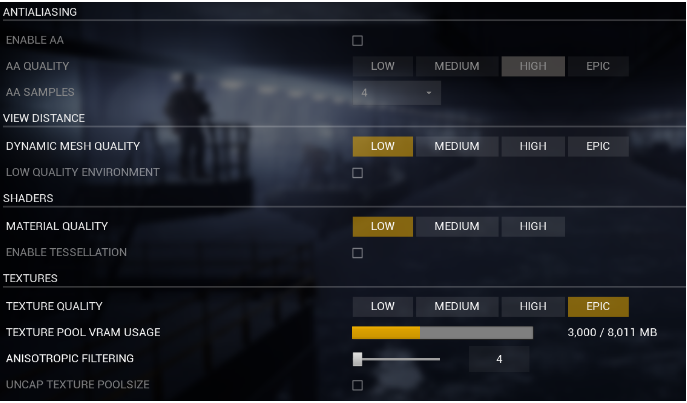
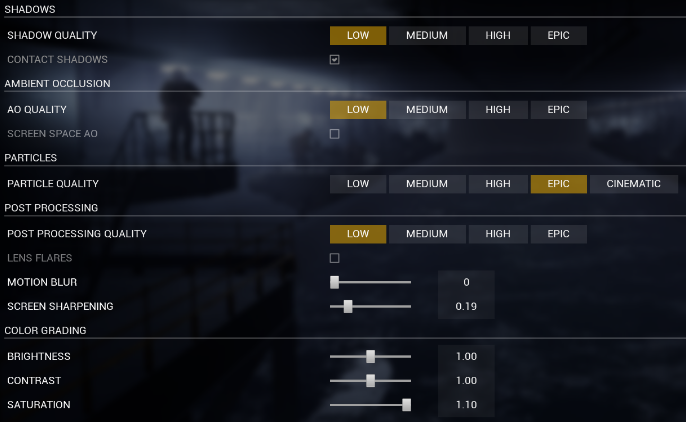
Graphic settings: Although a lot about graphic settings are personal preference, I have found the following settings to give me the best results in-game (as of v3.0). These are ethical settings and I recommend them to anyone with enough decency not to use .ini tweaks. I found it easier to see through foliage on epic foliage compared to low. Muzzle flashes are easier to spot on epic particles when compared to low particles. Upping these settings seemed to have minimal effect on my FPS. Some people argue that high shadows + contact shadows off is better than low shadows but I prefer low shadows as they seem to impact my FPS less when shooting.
Player Ol’ jim chasing epic muzzle flashes through the forest
Comparing low and epic particles
Additionally, look up your monitor on Google for some calibration settings in order to have the best colours (can increase vibrance and sharpness through the monitor this way if you wish).
Binds: I use all the default binds. A bind I would recommend adding is the SL/FTL order binds so that you can mark things whilst shooting without having to open the radial menu. You can do this in settings>controls>voice/command>place order. You want to avoid using the attack order (sword marker) as your character raises his hand above his head and this can give your position away in urban areas / when hiding in foliage.

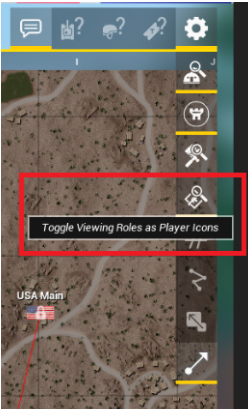
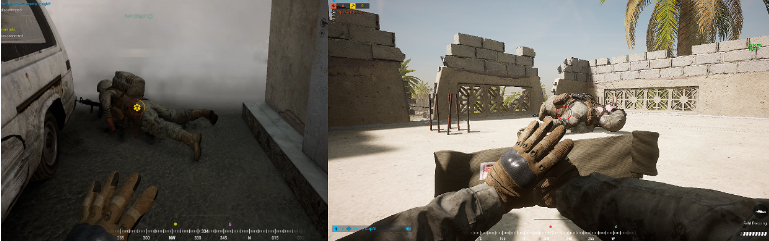
Player icons: Again, personal preference but I heavily advise against using the “Toggle viewing roles as player icons” to keep your squad mates as arrows on the map. If you want to know their kit, you can hover over their names; usually it is not urgent to know their kit (exception can be a crewman in a vehicle). The main benefit of keeping your squad mates as arrows on the map is that you can see which direction they are looking. This in turn lets you know which direction you should look if they need help and you are far away or a different angle you can watch to support them. You cannot do this with “Toggle viewing roles as player icons” enabled. This setting is well hidden and can be toggled through the map screen while in a round of squad. You will not always be spoon-fed information by accurate enemy markers.
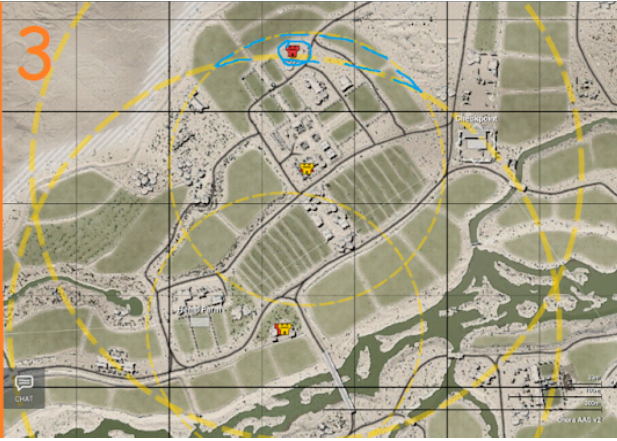
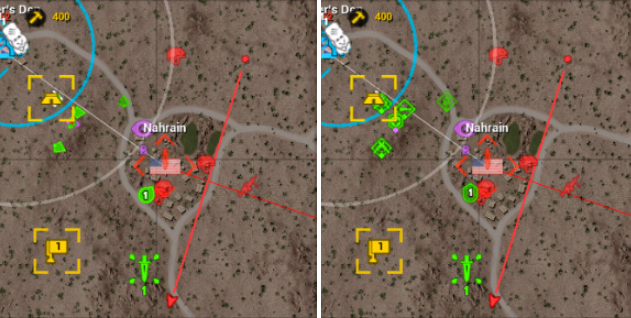 In the image below when I see the arrow of the downed player (looking north) near Nahrain combined with the helmet marker to the north-east, I can assume that they got downed while fighting a player to his north-east. Consequently, this gives me an idea of where to look first when I am spawning in to go assist them. Obviously, this isn’t the case 100% of the time as sometimes they could be looking in a random direction from being inexperienced or even be looking straight in the air. However, while having player arrows, you can still see their kits with an added bonus of knowing where the direction they are looking. If you use player role icons, you can not see the direction they are looking.
Filters: NVIDIA Freestyle filters are blocked by Squad and if you are like me, you don’t feel like downgrading your drivers to be able to use NVIDIA filters. The only correction I make to the colors above my monitor color settings is using the NVIDIA control panel digital vibrance to make colors pop more. (NVIDIA CONTROL PANEL>ADJUST DESKTOP COLOR SETTINGS>DIGITAL VIBRANCE

A lot of people enjoy playing with a bit more all-channel gamma (can be done in this same section of the NVIDIA control panel).
Kits
Below are some quick notes on the different infantry kits you could be playing in a round of squad.
Medic
The main role of the medic is to revive and provide stamina to teammates. As a medic, you should be the last one in your squad to die.
Medics should be sticking behind the squad and playing for trades. This means when their squad mate dies from close by, they should try to kill the enemy that killed the squad mate to get the revive.
If your teammates are good, they will die in good spots. You can revive them without even having to peek or throw smokes. Most bad medics are very reluctant and scared to go for revives; try to be more ambitious as a medic, especially when blessed with the opportunity of playing 2 medics in one squad.
The medic should constantly be moving to revive teammates and nothing else while there are dead people (avoid solo pushes and running in first).
Reviving other medics is the top priority as they can help you get the other revives or help you out when you die.
A medic can stick to key players such as the squad leader, optic player, machine gunners to instantly revive them when they die. This is coined being a “pocket medic”.
When your friendlies get hit and start bleeding, bandage them so that they preserve their bandage. Why? You bandage way faster than they do, and they will conserve their bandage to revive you if you die for some reason.
The medic should usually fully heal the players they revive. If you do not fully heal the player, they will be in a dead-dead state and lose a ticket when they die. Most of the time, “sticking the heal” is a better option than pulling your gun out.
When reviving, the medic should take command of the situation. They are alive so he knows what is going on. Tell the person you are reviving where to go to avoid getting sent to the spawn screen, and where to look (most likely area the enemies are going to come from). If someone is impossible to revive, promptly tell them that you will not go for them and that they should give up.
When reviving people or healing them, do not stand too close to them. You can stretch the distance you are healing/reviving pretty far and it will give them the freedom to move (if you are too close you will collide with their ADS).
Dragging can be good to move a friendly around a corner or through a close doorway. You can also drag someone off a high area into cover / cause them to start rolling off a slope. Avoid dragging long distances as it is usually just quicker and less risky to revive in the open than spending two times more time dragging.
Try to avoid proning/sitting still while reviving so that you can cancel the revive and run away faster. Exception to this is if you are hiding behind a small object like a half wall or a window.
Rifleman
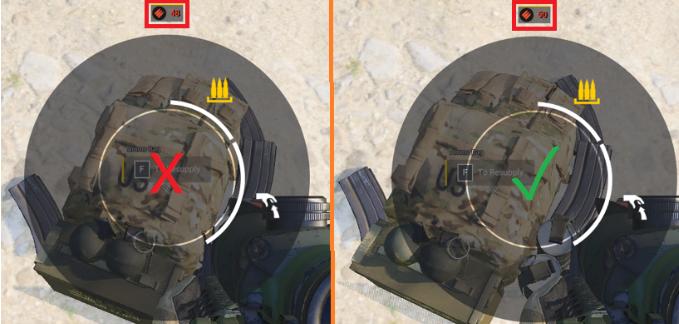
The main role of the rifleman is ammunition. The ammo bag the rifleman carries has many uses such as:
Providing ammunition to your squad leader (especially for a rally point). A good squad leader will constantly be rotating their rally point in order to keep it alive therefore you have to take initiative to re-arm them ASAP after they place the rally point.
Providing ammunition to a medic requiring bandages
Providing ammunition to an LAT / HAT as they are fighting a vehicle. When an anti-tank kit is engaging a vehicle, riflemen must take initiative to push to the anti-tank player and provide ammo for another shot.
Spamming grenades (using it as a pocket mortar - throw nade, rearm, throw nade, repeat). Great if you’re on dead-dead and can’t peek.
You need to be mindful of your ammo and make sure you ask your squad leader/use your best judgement to figure out if it’s okay to give your last 50 ammo (rally point). This is especially important for games where you know you won’t be having access to spawning on an ammo crate or vehicle.
 Besides providing ammunition (which you must remember to rearm at all times when near a friendly vehicle or FOB ammo crate), the rifleman’s other main task is to shoot at enemy infantry and ends up being the one with the most time to LMB at the enemies.
Light anti-tank
The main role of the LAT is to disable vehicles. There are some guides out there on where to hit vehicles in order to engine them or track them with one shot. When paired with a friendly vehicle, rifleman or ammo crate where the LAT can rearm easily, killing an enemy vehicle is achievable. When the vehicle is disabled, it is important to call it out to the team so that a friendly vehicle, a HAT/other LAT, commander ability or mortar can finish the kill.
A secondary role of the LAT when there is no risk of enemy armor attacking the squad is to shoot rockets at enemy infantry who are hiding or in clusters. When there is an abundance of ammo, the LAT can “rocket spam” meaning shooting rockets and rearming over and over.
It is the responsibility of all squad mates to swap to the LAT kit if it is open and there is an enemy vehicle causing problems in the area. Anyone can do this, even the squad leader.
Grenadier (GL)
The main role of the grenadier is to shoot explosives at infantry. This is especially useful when there are clusters of infantry or the infantry is hiding in buildings / behind cover.
The smoke grenades can be used in numerous useful ways such as blocking chokepoints, revives, screening vehicles, screening machine gunners, screening towers. The grenadier smoke seems to be way stronger than handheld smoke grenades.
Machine Gunner / Scope AR
The main role of the MG is to overwatch the squad and hold longer lanes.
A good MG will be patient in order to consistently maintain his ground.
A good MG will have to know how and where to bipod quickly in order to not overexpose for too long. By reading the map, the MG will rotate and find lanes to cut enemies off / protect their squad.
Usually need good game sense to play this role properly in order to choose what lanes to hold and when/how to rotate.
Montage of player Ol’ Jim holding a lot of ground as MG… edited with zoom to help see targets in the video
Squad Leader
Squad leaders are super important for winning the game. Not only do they place crucial spawn points (rallies & FOBs),but they also have communications with the other squads; extra information that can aid them in calculating the squad’s next move. Squad leading could be a huge guide of its own so I tried to regroup some of the most important fundamentals that have the biggest impact on the game.
Make sure everyone is playing for the same goal. You generally want to avoid players just doing their own thing away from your squad’s goal (for main infantry, except if they are filling a special function). Every individual will have a different playstyle, and the squad will need to make sure all these are put together for the same goal. The goal could be executing a HAB take, defending a flag, capturing a flag, etc. Using an example of attacking an enemy hab, below are some examples of what players could be doing to contribute to this common goal (in order of aggressivity):
Finding gaps and shoving:Utilising good game sense, this player found an area that is not covered by the opponent and punished the enemy for this open ground by shoving ahead of the squad. Usually, this shover will be the first one on the HAB. Inexperienced teams often play heavy on the flanks; the gaps could often be found in the wide-open centre or along the lattice lines. The player who aggressively finds gaps and shoves is usually very confident. Once on the HAB (and it is blocked by other friendlies that have caught up), this player will remain the tip of the spear by continuing the push to buffer out and stomp backup rallies / returning enemies from different angles.
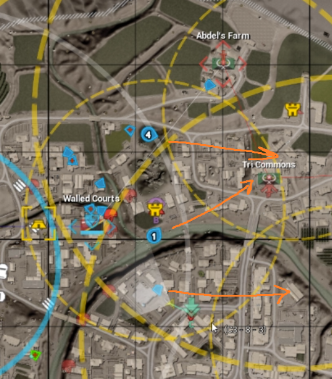
These 3 players could be in the process of finding/abusing a gap in the enemy (orange lines)
Poking holes:This player found an area that was covered by enemies, and killed them. By doing this, they are poking holes in the defence of the enemy. By using good game sense, the player can then decide whether or not to shove through this potential gap (utilising aforementioned notions of tempo and momentum) to get onto the HAB / past it.
(video of player Rehtori poking a hole)
Crossfiring/overwatch:This player is often playing in a separate lane and covering your squad from there (crossfire) or he is sitting from afar and covering (overwatch). I feel like the best kit to accomplish this is the machine gunner or an optic player that has a more methodical playstyle. In this situation, at the start of the HAB take, this player could be farming the HAB from afar. Once his squad is on the HAB, this player would be sitting on a hill overlooking the HAB and areas enemies could run back from to retake the HAB. This player adapts a more analytical & methodical playstyle.
Videos of player Ol’ Jim saving my ass
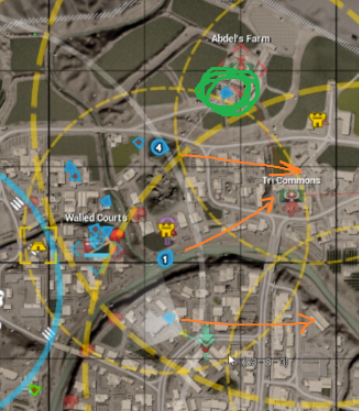
By looking south, the player circled in green could be overlooking his squad from another lane
Anchoring:Once on the objective, this player will usually sit on it and hold a more passive angle. They could be the one shovelling the HAB and moving to re-frag / gain ground off the players that were more aggressive. When utilising two medics, the best player for this kit is the scope medic (when he dies he is a quicker/easier revive for the other medic). This player adapts a more methodical playstyle.Lurking:This player will purposefully ignore enemies and disengage (will call them out of course) in order to sneak by with the intention of getting behind the enemy and stomping the rally point/getting info. Afterwards they can abuse a gap and keep pushing or wrap back towards the rear of the enemies to help the rest of the squad get through.Pocket medic:This player is closely prioritising key players as a medic; acting as a skill amplifier by making sure the player that is being pocketed is constantly alive and in full health. A very important part of the squad, this player is usually playing the ironsight medic and has to adopt a very passive playstyle (see medic section about being the last one to die). The only times they will have to use their weapon is to refrag in short-mid range combat.- The solo medic attacking a flag 2km away from your squad (useless, kick from squad)
- Et cetera
The squad leader ensures to minimise travel time between tasks/objectives. You can do this by using a vehicle to travel (APC, heli pickup, etc.).
The squad leader’s number one priority is to constantly have a rally point online. When placing a rally, you want it to be up for the whole game (a good rally) by using the fundamental ideas mentioned in the spawns section. Don’t be afraid to put it further, usually the benefits of a close rally is not worth the cons of running for an extra minute by placing the rally point 300 meters further.
When the rally is placed, you must always have a rally point in your inventory. Always make sure to rearm off your vehicle or rifleman after placing the rally point so that you don’t get caught with no ammo later in the game when your riflemen are dead and your vehicle is nowhere to be found. Always be moving to place a better rally for your objective (situational, your rally could be left behind as an anchor or sensor). When flanking to have a better rally, move with a 2nd guy (usually a medic) while your squad draws fire. The rally can also be rotated by using a small armoured piece such as a TIGR or MRAP. By doing this, you could suddenly have your full squad spawning behind the enemy and induce panic.
Abuse rally scanning. When your rally is placed and you have another one in your inventory, you can use it to determine if there are enemies within 50 meters. The first thing the game checks for when placing a rally is if there are enemies, and if there are none, a timer will not be applied. You can keep using your rally point (make sure there is no one around you or it will accidentally place a rally) as a scanner to see if there are enemies nearby. A timer will be applied if there are hostiles in the vicinity. If you do not predict needing another rally and don’t care for the risk of getting placed on a placement timer, there is no reason not to abuse rally scanning to get an idea of where the enemies are. This technique is especially useful for foliage maps where people are just proning and waiting for you.
Demonstration of rally scanning
When fighting with your rally as the primary spawn, ensure that your squad is spawning in sync (makes it easier to fight for the same goal when everyone is spawning together).
Pay attention to the big picture (everyone’s job but specifically squad leader). Mention suspected gaps and timings. If players are not taking initiative to do certain tasks (such as abusing gaps, etc.) you will have to micromanage. Watch how the other squads are moving.
Ensure you are not tunnel-visioned on your objective. You can do this by paying attention to the other lanes around you and crossfiring (hope that they do the same for you or sending one of your own players to go crossfire on their behalf.
This is another thing that is everyone’s responsibility but often you will have to micromanage it as a good squad leader: coordinating explosives. Hard to reach areas can be hit by explosives such as mortar, vehicle, GL, LAT. If you kill someone in a building, they will probably be reviving and you can get the dead-dead with explosives.
Squad Composition
You must be wondering why the medic section above is so long and detailed… that is because other than the squad leader, medics are the most important kit of the squad for main infantry. The skill of your medics and the ability of friendlies to die in good spots make or break the squad. Quite simply and obviously, the medic is there to revive and heal people. However, you can definitely spot the differences when you are playing with a bad medic as the squad will constantly be getting wiped or giving up to respawn on rally since the medic is off doing his own thing or dead. This results in a loss of ground, slower attacks, and loss of tickets.
Several factors are taken into account when figuring out what kits to use in a squad (map, match size, etc), but there are some rules of thumb to follow. Often, it is up to the player to take initiative to choose what role to play in order to help the squad. Keep in mind these are for main infantry squads.
- You usually want at least one rifleman in the squad (for ammo bag)
- If the squad has four or more players, you need two medics. Running two medics increases the odds of getting revives (speedier revives + getting people out of dead-dead + giving stamina). The scope medic often plays a bit more aggressively while the ironsight medic hangs back and has priority for getting the revives. The ironsight medic should only be using his gun to re-frag therefore the scope isn’t really required (usually a CQB situation). A squad with two medics will usually burn fewer tickets as they will give up less.
- Consider using two LATs for the rollout if you are going in an area with likely enemy vehicles (switch off ironsight LAT later)
- Consider employing an MG for long lanes, squads that will be holding.
Playstyle Spectrum
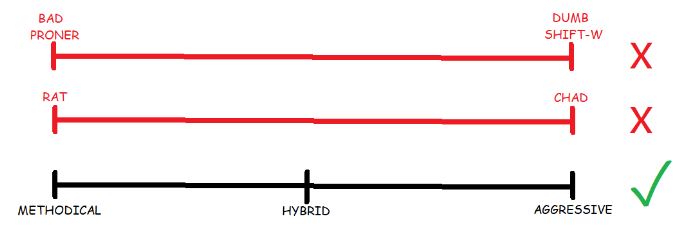 Above, I attempted to explain how players can contribute to the common goal of the squad. It is important to not mix up those jobs with squad playstyles. Playstyle is the inherent way someone likes to play. People tend to mislabel playstyle as “rats” vs “chads” or “dumb sprinters” vs “pussy proners”. From my experience playing with a lot of different people and playstyles, squad playstyles can be separated into two extremes - aggressive players and methodical players.
Good aggressive players like to quickly poke holes and shove through the enemy as fast as they can. They are often the first players to reach the objective and usually get a lot of kills by making the enemy panic with their speed. The downside of this style is that they will often die a lot. If not playing with like-minded aggressive players, they will often die in un-revivable positions and constantly give up. This playstyle is more inconsistent than methodical but is critical to making sick plays that win games. Think squad version of the Counterstrike entry-fragger and maybe even combine the lurker.
Good methodical players like to remain in complete control of the situation (this is not to be confused with “passive”). They will usually be supporting the team by providing crossfire, anchoring, overwatch, and refrags. Being methodical does not mean they do not push or that they are slow. A good methodical player will still be poking and abusing gaps at the right moments. They will often die in revivable positions and die less than an aggressive player, but will usually get onto objectives later after the aggressive players.
In my opinion, the most versatile and strong squad players are those who can play both the methodical playstyle and the aggressive style. They know when to use one style over the other and can quickly flip the switch on how they are playing (in a matter of seconds), making them extremely unpredictable and deadly (I have no idea how they do it). Let’s call them hybrids.
For inexperienced players, I recommend you find a style that attracts you the most / the one you are better at. Stick to it and perfect it before moving on to attempting the other style. The aggressive playstyle is extremely hard to get into for the mechanically disadvantaged and can be more punishing for someone starting off (leading into int feeding). The methodical playstyle is difficult to master as you need to have the game sense to know where to play from to not be as useful as an AFK person.
On the topic of squad and team composition, I can not tell you what the best way to combine these playstyles in a team is. Is it better to have squads of only aggressive players followed by squads of only methodical players? Is it better to have squads with mixes of many playstyles? I think both are viable and combining these two ideologies is the strongest. For squad composition and team composition I would focus on cohesion and synergy at the player level before looking at playstyle.
Tempo & Momentum
Tempo is a term I learned back when I played Hearthstone and it has stuck in my head since then. In simple terms, it describes which way the momentum of the round is going, and the control the player/squad/team has over the round. When you enter a round of Squad, you are constantly and subconsciously using tempo albeit some players better than others. Your goal as a game-aware infantry player is to always keep the tempo on the side of your squad, and your team in order to win.
During the rollout / opener of your squad round before your initial skirmish, the tempo is neutral. Neither team has map control yet and the tempo is close to even. As you kill enemies and they are in the downed state, they will be getting revived or resetting off a spawn… you are gaining tempo. If you die, you lose your tempo. Get it?
Now for an example from a common scenario found in a match on Chora AAS v2. You are on Chora AAS v2 Hemp Farm as the US during the first engagement of the game. The Russians have put a FOB in the “Saddam’s Compound” (the cheese grater building west of Hemp Farm). You push through Hemp Farm killing two enemies, increasing your tempo. The more your tempo increases, the more confidence you achieve to motivate you to push across the street to the enemy HAB with your teammates (who were also killing enemies - SL could be the one monitoring tempo at the squad level). This quick gain of tempo at the start allows you to win the first engagement, stomp the enemy HAB and make them hard reset on the flag before.
Apply this concrete scenario to most firefights you will encounter as an individual infantry player in Squad. You will often be fighting 0 to 3 enemies (applies for most situations, will obviously change with proximity to enemy spawn). Squads are usually very spread out so it is rare you will be fighting 1v8 (you also have your teammates to help you). The table below dissects common firefight scenarios where there are enemies present, and the tempo you could gain when your reaction is to push through.
| Aggressive action taken | Potential tempo |
|---|---|
| Kill no one and push ahead By far the riskiest option as you know there are enemies ahead but you take a calculated risk by pushing through the front line (abusing a gap). Consider this when you hear gunshots in front of you that aren’t directed at your general direction. This tells you the enemies are shooting at friendlies and are scoped in / distracted meaning it could be possible to push past them and abuse a gap to find a spawn or shoot them in the back. It’s a feeling thing and one of the hardest parts of lurking or aggressive playstyles. Note: You must be decisive when pulling this off, if you are not gaining ground you MUST peek and help your allies that are getting shot at (especially when you aren’t getting shot at). |
You gain free tempo by abusing the gap and gaining ground, becoming undetected behind enemy lines. The possibilities are endless now: locate HABS, stomp rallies, shoot enemies in the back, etc. Remember to be decisive and always play for the common goal of your squad. |
| Kill one player and push ahead You see a player ahead and he is very close to you and you are fighting him. You win the fight and kill him (poking holes). You decide to assume he has no buddies around him and you push through. |
After pulling off this move and deciding to push off of it, you need to decide if you slightly flank around the body or push straight through (depending on opponent style, map, etc.). When poking holes you gain tempo (usually not as much as abusing a free gap), if the enemies don’t refrag you after the kill (lose track of you), they will know you made it past them and will likely chase you. |
| Kill two+ players and push ahead You fight a couple people, you kill all of them. You decide to push through off of it (creating huge gaps) |
This is the most amount of tempo you can gain for your team as an infantry player in a firefight (other than stomping rallies or killing radios). Killing a lot of people is an instant tempo gain and a lot of the time, this specific situation is what gets you the flag or the fob take. |
Friendly Spawn Game Sense
Spawns are extremely important in Squad, therefore it is important to know how to play with them. When mentioning spawns, I am talking about HABs and rally points. These are top priorities to properly attack/defend and move around the map; failure to play properly with your spawns will result in resetting from main or being stuck on the spawn screen. If main is being camped and you have no spawns, you could get rolled by the enemy team. Below are some pointers/tidbits of information for when you are playing off of a spawn point in Squad:
General (Rallypoint and HAB)
- Avoid shooting off of spawn if the opponent does not see you (especially off a rally point)
- For the first couple of spawns (when undiscovered) do not push in a straight line off the spawn point; this will make it extremely easy for the opponent to detect the spawn.
- Don’t tunnel vision your objective/task. Once spawned, get in the habit of doing a quick 360 and paying attention to what is around the spawn. A lot of people are on autopilot when spawning and fail to realise there is a combat engineer on the HAB/FOB.
Rallypoint
- The rally point can only be placed if there are no enemies within 50 m
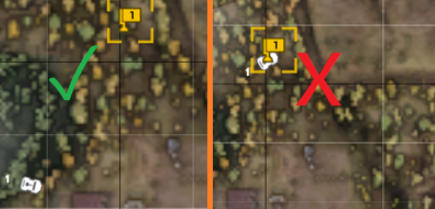
- The rally point is automatically stomped when enemies come within 30 m. Thus, ensure the rally point is not placed within 30 m of a road (to avoid stomp by vehicle) or common areas where enemies will push through.
- Ensure rallypoint is not placed in the open. A rally that can be spotted visually by the enemy is a bad rally. There will always be a bush/hut/etc to place your rally to reduce the odds of the enemy visually spotting it. Literally no reason to ever put a rally outside of concealment.
- Do not leave a vehicle on your rallypoint, inexperienced squads will leave the vehicle on the rallypoint (this is an extremely common mistake and makes it super easy to stomp rallies). Get in the habit of moving the vehicle off your rally, even if it is 50m away (aim for hiding the vehicle too) it will give you much better odds of preserving the rally.
- Constantly check your map for the rally stomp (it is everyone’s job)
DO NOT SHOOT OFF OF RALLY POINT.With the small stomp radius, enemies can often run past it without stomping it (if they don’t catch you shooting off of it or running off of it)
HAB
- Do not leave a vehicle on your radio (same point as rally point)
- If your HAB is blocked and there are no friendlies in the vicinity to help you from outside, you must fight to unblock it as soon as possible (valid for most situations). The longer you wait, the more enemies that will stack up and the harder it will be to unblock it.
- When possible, ensure HAB/Radio is not outside (mortars)
Teamwork and Communication
Squad is a game of teamwork and communication. To achieve this, you as an infantry player must effectively communicate information to your squad mates and your squad leader. To explain the concepts below, I will use a simple example of a head on firefight versus a few enemy infantry. The first thing you should do if not done already is report the initial contact in squad chat; this is done by calling it out using the 3 D’s (distance, direction, description). Distance is quite simple and can be estimated (avoid numbers), I prefer going for “super close”, “close”, “far”, “far af”. Direction is given by cardinal point and you always have to give your reference point when talking in squad chat as people may be in different positions; examples of this can be “North-West of Hemp Farm”, “South-East of Squad Leader”, “South of Squad Leader 3”. Listen to the communications in your squad and stay brief, avoid repeating information people have already stated.
In Squad, the description of the target is extremely important in knowing if the threat is neutralised (if you call out an MG, and a teammate kills a rifleman, then you know that there is still an MG in the area). Furthermore, some contacts require different reactions; an enemy armoured vehicle will require the riflemen to link up with the LATs, LATs will have to get in a proper position to fire from. A call that your rally has gotten stomped will prompt the squad leader to disengage with a squadmate to replace the rally. When talking in squad chat, it is extremely important to be brief. As Squad is a game, a way to call out a target in a much more brief way is using the FTL markers (explained in the first section of the guide on binds). First of all, the marker shows up on the map so if an infantry player isn’t sure where to look, they can look at the map. Second, the marker also shows up on the compass giving you an exact bearing to look towards relative to your position. This can even help in spotting targets through foliage as you have essentially fixed the position of the enemy contact, all you have to do is scope in and look very closely at that one point. If you have many things to call out and mark for the team that can be too complicated to explain by voice, you can borrow the Fireteam Leader role in order to accurately mark them on the map (such as the positions of the emplacements on an enemy mortar FOB). Fireteam leaders should be the ones passing around the FTL role amongst themselves for this purpose.
Apart from calling targets out in squad chat, talking in local chat to your teammates is extremely important. The 3 D’s can be used as well (being as brief as possible), and bearings can be used when trying to give accurate positions of enemies to friendlies around you. Things you absolutely need to take into consideration when thinking of what to tell your teammates are the following:
- Distance, direction, description of threats
- If the enemy is shooting at you, you can alert your teammate to peek him as the enemy’s attention is focused on you.
- If you went down, did you trade? Are you in a revivable spot? Are there more enemies in the area? Was the enemy passively hiding or aggressively rushing? Is the enemy bandaging? You can guide your teammate using only audio and the information you know about this enemy infantry player. You died to him last, most of the time that means you have the most information on that situation with the enemy. If you don’t have information, it most likely demonstrates that you made a mistake and died in a stupid way by not gaining information.
- If you have no idea where the person is, don’t be afraid to say that you don’t know (don’t just stay quiet, don’t invent false information and bait your teammates)l
- Enemy give ups
Other elements that need to be called out in squad chat relative to spawns, for example:
- If a HAB is blocked and a friendly is near and oblivious
- If a HAB is unblocked and becomes spawnwable
- If your rally gets stomped (to alert your squad leader to place another one)
- Enemy give ups (the enemies are giving up as there are no medics nearby and they are respawning)
- Rally timer reaches ~10 seconds and there are dead people in your squad on the ground (the wave of the rally is a 60 second timer that constantly restarts, if you die 30-60s into the wave of the rally, you are able to make it and spawn on this wave. If they die between 0-30s of the wave, they will have to wait till the next one. This in turn alerts teammates if they should give up and respawn in order to get back into the fight. It is better to be inactive while downed (maybe getting information about people running around you) than being inactive on the spawn screen.
Rally Timer and Being in Sync
There is a definite way to be on top of the rally wave. As an infantry player, you always want to minimise the amount of time you are waiting to respawn on the rally (for the aforementioned reasons). This can be done by dying 30-35s before the wave - meaning you will only wait 30-35 seconds to spawn on the rally. If you die at a bad moment, you could have to wait for up to 90 seconds to spawn on rally. This is a difference of 60s and can represent many lost minutes in a game if you sum all your deaths. Let’s say your rally is placed on the 48th second of the game clock, it means it will keep spawning a wave every 60 seconds on xx:48 game time. In squad chat, you want to write “w48” to know when to give up and catch the wave. You want to give up 5-10 seconds before w48 so you can respawn on it instantly, thus limiting the amount of time spent in the spawn screen. Keeping the rally timer in your head is an important skill to have and can even influence when to push the enemy (if you die, you minimise time dead in order to get close to the ideal 30s respawn timer mentioned above).
By keeping track of the rally wave time, it can help the squad keep their spawns in sync. Ideally, you want no one to die and respawn in your squad - but we all know in a game of squad it is almost impossible to achieve this. The second best thing is people dying in safe spots and being able to get the revives, again, no need to give up and use rally - this is also hard to achieve as people make mistakes / there are a lot of variables to control to achieve this. The next best thing is that when people die and revives aren’t possible, everyone spawns in together on the rally point in order to instantly have cohesive pushes as a squad. Not being in sync can be dangerous for an inexperienced squad as it will lead to people pushing one by one into the enemy. A more disciplined squad will still feel the disadvantage of not being in sync on the wave as they will find themselves having to wait for their squad mates on the next wave to catch up to them. Especially annoying when your medic is out of sync.
Where and How to Die
In a game like Squad, a fundamental part of infantry play is the ability to get revived. With that being said, you should constantly be positioning yourself in a position where you can easily be picked up by a medic during the firefight if you go down. This should constantly be going through your mind while playing. Examples of this are standing in a building and shooting through a window, shooting from behind hard cover such as half walls or rocks, shooting from a sloped surface where your body will fall off or roll off when you die (like a berm). Keep in mind that you are never 100% safe for a medic to come revive you when mortars, vehicles, grenades, and explosives are in play. It is good practice to guide your surrounding teammates and medics in local chat while you are downed. This includes the position of the enemy that killed you (or if you don’t know, you can mention that as well), the amount of enemies and their weapons (is it a vehicle, is it an MG, rifleman?), and if you are safe to revive. Furthermore, while in the downed state, you can listen for audio queues from the enemy such as bandaging, loading a grenade in the grenade launcher, throwing a grenade, etc.. These are all important situations to forward to your teammates as it is easier to push an enemy when they have their bandage out. By telling your teammates how and where you died from, and listening for important information while you are downed, you are remaining an asset to your team.
There are good times to die and bad times to die. When there are downed players in your squad, you shouldn’t be making aggressive peeks even if it means dying in a safe spot. In my opinion, there are two and a half perspectives/styles on how to play while you have downed players in your squad (it is all very situational, as long as you don’t do the first thing I mentioned above… your death must not be useless):
- 1: Gain ground and buffer with the goal of keeping the enemies occupied during the revive (most risky) … can be useful if you are trading your life for three revives etc.
- 2: Take a more passive position while waiting for your medic to revive (if you die, that could prompt the enemies to push your medic as they are doing the revive)
- 2.5: Rotate with your medic in order to re-frag the guy that killed your teammate & help medic revive by covering him from close (in my opinion this is the strongest)
If you have medics around you, you know you can be a bit more ambitious with your peeks as you will get instantly revived if it is a good medic. This can even mean standing on top of a wall/ roof/staircase (granted you position yourself so you fall into cover afterwards. If the medics are far away, you should be more cautious with peeking as if you die you risk respawning and burning the ticket.
Types of Environment
Different environments call for different types of positioning - I have special things to mention about urban and forest maps, I plan to rework this section down the road.
Urban (Al Basrah, Fallujah, Logar, Mutaha, Narva, Sumari): As a rule of thumb on urban maps, you want to play from the buildings and move from building to building. Running down open roads and sidewalks should be avoided. I am not saying to sit in buildings and never push, I am saying to use the buildings to push.
Forest (Fool’s Road, Yehorivka, Gorodok, Skorpo): As a rule of thumb on forest maps, you want to slow down your movement when fighting in forests as it is incredibly easy to see people when they are moving fast in the forest. The slower you move, the harder you will be to spot when trying to push. I am not saying to push less, I am saying to push more slowly.
II) The Objective
Enemy Spawn Game Sense
As you gain more experience in the game, your game knowledge will improve, and thus you will be able to have better callouts regarding developing situations. Something you can think about when trying to count the number of enemies you are fighting is remembering the size of a squad, and the ways the enemies can spawn. Squads that feel big when fighting them are usually ranging from 4 to 9 infantry. The direction they are running from is usually (especially against inexperienced players) the direction their spawn point is located. If you see a “trickle effect” of enemy infantry pushing you, it can mean they are pushing off of a HAB (everyone is on their own spawn wave with the HAB). If you see a pack of infantry all pushing at the same time in a tight cluster, it can mean they have just spawned on a rally wave. As people spawn in on the rally point, they are very clustered together. However, as they move up and push, they tend to spread out more. You can use this information to gauge the range of the rally point. The time it takes the enemies to return to the fight after respawning is also good information representing the distance they have to run in order to come back. The wave of a rally is 60 seconds and the time for a person to travel on full sprint over 300m is also 60 seconds. Combining this information will allow you to gauge the position of the rally point. The following is a concrete example of calculating the amount of time it takes for someone to get to you: you kill a marksman and he gives up. You notice it takes about two minutes for him to come back to die again. This could mean that there is a HAB ~600m away. This timing trick seems dumb but trust me, it works… people are usually running straight off of spawns. Regardless of differentiating between an enemy rallypoint or a HAB, it is of prime importance to communicate your findings to the squad; in my opinion, it is one of the most important callouts an infantry player can make. By calling out the rough position/direction of the enemy spawn, your team can position itself to take it out or react to it. If you can’t tell if it’s a rally point or a HAB, calling out any spawn to the squad is still way more viable information compared to no callout at all.
Another element you can think about when fighting infantry is their kits (I will talk about a concept I call “kit memory” in a later section). You are fighting the enemy team in a forest and you have just killed two players. Both players were squad leaders. This means you are fighting two squads (you can gauge the size of the squads with game knowledge and experience), but usually if it feels like you are fighting a lot of people and you see two squad leaders in the area, it can mean you are fighting up to 18 people (and likely two rallies, two angles to get attacked from)! A more abstract way to apply this are kits such as medics which are locked to two per squad. You see three enemy medics in the span of 60 seconds. As a squad can only have two medics, this means you are fighting at least two squads.
The paragraphs above are just some of many examples of the information you can get by being attentive. With experience, collecting information about the enemy team becomes much easier. If a whole enemy team is fighting from the same angle (can be seen by catching a lot of SLs), that means there is a big section of the map where there are not many enemies, if any - allowing for an easy attack for other squads.
Tempo value of the enemy rally point and FOB
| Rally point stomp tempo gained | Disabling FOB / HAB tempo gained |
|---|---|
| Enemy squad leader is busy fighting on an objective and will have to pull back to place another one with a squad mate (fewer people in the fight) Enemy squad leader ignores/doesn’t realise he has lost his rally and plays without a rally (fewer spawns) The squad leader is dead and can not replace his rally (will have to reset off a HAB) |
Enemy players will have to run back and UNDERREACT. They die AND they lose the radio. (taking people out of the fight) Enemy players will have to run back and OVERREACT. They save the radio (taking people out of the fight) Enemy players ignore the fact that they lose radio in exchange to keep fighting. (team has fewer spawns on the map) Besides tempo, you remove 20 enemy tickets by killing the radio. |
Yellow Ring Usage
FOB creation markers are extremely strong for locating enemy FOBs/HABs via inference. Only squad leaders can place them and it is of utmost importance to be aware of this concept. FOB creation markers give you two vital pieces of information: the build radius and the exclusion radius. With this, you can accomplish three big things:
- Infer the location of an enemy radio attached to a FOB/HAB/Rep
- Estimate the location of a second enemy radio
- Predict where the enemy will go to place the next FOB
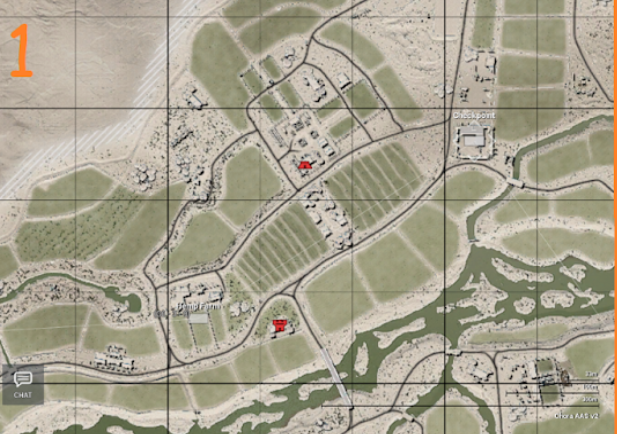
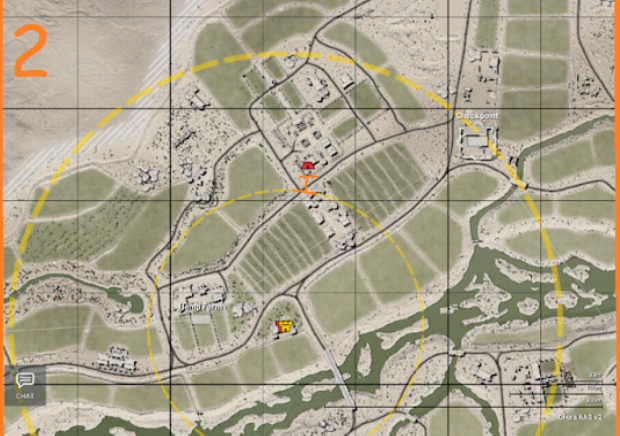
To do these things, you need to first get accurate markers on elements attached to the fob such as fortifications, repcrates, ammocrates, HABs, logistics vehicles if you hear them resupply (they can only resupply within the fob radius). The further these objects are from the estimated radio location, the better they will contribute to your finding of the enemy radio. Once you have found one or more emplacements, you will place the fob creation markers. The build radiuses of the fob creation markers will intersect to create a zone where the radio could be located. From this point, using common sense, you can figure out the likely location of the enemy radio. In the video below I found an enemy HAB on Hemp Farm POI, an enemy HASCO wall on the mine marker, and I heard an enemy logistics vehicle dumping his ammunition on the road. I place my yellow markers and get my potential radio zone (blue zone at the end of the video). If my enemy is not terrible, I know they will place it inside of a building so it does not get mortar; the radio can only be in one possible building (circled in blue at the end of the video).
From here, I noticed that the enemy has a HAB north of the located radio (insert yellow marker). This new HAB is outside of the build radius of the initial radio, therefore I now know that the enemy is running two radios. The second potential radio zone is a very small crescent and using the “don’t-place-the-radio-in-the-outside-where-it-can-get-mortared rule”, I can find its most probable location.
HAB Takes
A very bad habit many players have when attacking an enemy HAB is just to rush inside of it to get the tasty kills awaiting inside. The proper way to take a HAB is to first block the enemies from spawning and wait for reinforcements. To block a HAB, you need two players within ~19 metres (scales with more players up to 8 players for 80m). This means you can hide in the grass, a bush, or even a building next to the HAB before trying to push it. While blocking the HAB with two players, the enemies will be forced to push out to you (to unblock the HAB). The more time the enemies wait and cower, the more of your allies will come to help you with the HAB take. To help with gauging the 20 metre block radius of the HAB, you can ask your Squad Leader to put a green range marker on the HAB; this will give you an idea of where to stand in order to be in the block range. Once the HAB is blocked, you can either disable it if the radio is not within the block radius or destroy the radio while simultaneously blocking the HAB.
To summarise, first block the enemies from spawning (by standing within 20m) while waiting for reinforcements. Once the reinforcements arrive, push it. In the process, you will also discover the angle their backup rally is placed in, in case they do have one.
If you get onto a HAB solo and have no friendlies in the vicinity, camping it can be a viable option to induce panic in your enemies and have them react to you. When camping a HAB, you want to be on the west side of it as the enemies spawn facing east (they will have to 180 you to stop the camp).
A FOB is worth 20 tickets and cripples your enemy’s ability to quickly spawn / easily have ammo.
Attacking a Flag
When attacking a flag, you have the goal in mind of capturing the point. To start capturing, you must have at least three players in the point and if enemies are present, you must have one more player than them present in the cap. With this information, you can estimate the number of people in the capture point if you are not capturing. If you enter as three people and instantly start capturing the flag, you can be certain there is not a single player in the capture point. If you only start capturing the flag when the sixth ally enters the flag, that means there are five enemies on the capture point. (chevrons help too).
Many strategies can be used to attack a flag and I will not cover them in this guide (other than the one below) as I want to focus on individual play and being an asset to your team. As a rule of thumb, if you are close to the point and you see that the capture process is being stalled by the enemies, it is good practice to enter the flag to contribute to the capturing (bodying the flag). If you stand 1cm away from the flag while it is capturing, you have 0 game sense.
Attack flag by taking HAB
A very self explanatory title, but I found that many inexperienced players overlook it. You can put immense pressure on a flag by blocking the enemy defensive HAB, in turn making the enemy run back to save the HAB. This frees up gaps for other squads/players to push into the flag and attack. The opposite scenario applies, attacking a flag and starting the capture could make the opponent panic spawn on the HAB and run into you as you hold smart angles.
Holding a Flag
Once you have cleared the enemies out of the capture point, and your squad is responsible for finishing the capture, there are different things you can do to defend the flag. These elements also apply to holding a capture point from enemy forces as you capture. Fundamentally, the team should cover all the possible angles the enemies can come from, often this is 360 degrees around the capture point.
First of all, on most capture points in the game (especially bigger maps), a “coffin style defence” is one of the hardest ways to hold a flag and is usually not optimum. A coffin style defence is when the whole squad stays on the capture point and attempts to hold angles. Yes, it is very important to have infantry players on the capture point holding angles, but they are very vulnerable to explosives and mortars, and you do not give your team much time to react if you lose your hold.
When holding a capture point, some players need to “buffer” the flag by pushing and covering ahead or on the flanks to wipe enemy rally points or overwatch the flag from a different area (early warning system). This in turn will allow for a stronger spread and allow these players to obtain accurate intelligence on the movement of the enemy team; ultimately allowing for a better reaction of your own team. As an infantry player, if your squad leader does not specify exactly what they want you to do, you will have to take initiative to either hold an angle on the flag, or buffer out and cover your squad from the outside of the capture point. It is important to note that if the enemies are capturing the flag and you are in the area, you should probably go on the capture point in order to stall the capture process.
Lastly, over-reacting to call outs should be avoided. If an enemy is called out on a section of the capture point, or even your spawn, not all infantry should react to this as it will create gaps in the hold.
Rushing a Flag and its Counters
Rushing a flag means assaulting a flag before the enemy’s middle flag and attempting to hold it in the opener of a round of AAS. Often, a rush will be very chaotic and hectic and players will tunnel vision on tasks such as taking down a FOB or killing an enemy logistics truck entering the flag. Countering a rush in the current meta is extremely easy for most capture points as the enemy team only has to sneak one person into the capture point in order to start capturing.
The primary task when executing a rush in AAS is to ensure the enemy cannot capture the objective. To do this, the individual player must be very aware of the capture zone status (to know if someone is in the point capturing… look at chevrons). If someone is capturing the point, everyone must work together to search the point and neutralise them. Efficiently clearing someone off the point during a rush requires experience and knowing the flag layout. Once you are certain the back cappers are killed flag is empty, you must hold a perimeter around the capture point to prevent people from sneaking in.
As mentioned, countering a rush is very easy but squads often become overwhelmed. The priority is to sneak someone into the capture point and this can be done in many ways for example: having squadmates shoot the enemy from an opposite direction to divert attention, swiftly jumping out of a vehicle that is driving around the capture point, or having an intelligent back capping position (more on this in the next point). Game knowledge helps as knowing where the capture points start and end are helpful to know where to sneak to.
Back Capping
“Back capping” signifies a player capturing the first set of objectives. The primary task of the back capper is to hide in an intelligent spot to keep capturing the flag in the event the enemy team rushes it. By hiding in an intelligent spot, the back capper can relay information when being rushed (if they need help) and stay alive for as long as possible. An intelligent back capping strat could include blocking yourself in with fortifications, allowing a safe cap even if enemies are present. Every tick of the capture process counts as it will help with countering the rush later in the event the back capper dies. While sounding unimportant and boring, one or two intelligent back cappers is extremely important to a round of AAS. Again, game knowledge helps immensely in order to know hiding spots and which caps are more rushable than others.
(not a backcap but the same principle applies)
Ticket Thirsting
Beyond map control, tempo and gaining ground, you need to be thinking about tickets. At the end of the day, you win a round of AAS by tickets (seems obvious doesn’t it?). Every ticket matters, the confirmed kills you get contribute to the final score. Push this mindset further by remembering the importance of flags, fobs, and vehicles for increasing the ticket delta/difference. A flag flip garners you a ticket delta of 70 tickets (+60/-10). A radio kill gets you a ticket delta of 20 tickets. A logistics truck/technical that gets left lying around gets you a delta of 5 tickets.
You can benefit from taking abandoned logistics vehicles / other vehicles hostage so that they don’t respawn, but as the game goes on, you should definitely aim to kill the vehicles for the tickets. You would be surprised to see how many vehicles are abandoned in the enemy backline, those 5 tickets add up extremely quickly. You could say a 20 kill game in top comp is a solid shooting performance… What about 4 logi vehicle kills? A single fob kill? Not as impressive I know but it gets you the same ticket delta.
So now you may be thinking, how the heck do I kill these logis when I see them? I am only a rifleman. Step 1: Mark the abandoned vehicle on the map Step 2: Call mortars on it
No mortars? Call an AT or use a small vic to kill it. None of those? Shoot some rounds into it with your rifle until it blows up (only do this one near the end of the game when the desperation kicks in).
Vanilla AAS Mechanics
TICKET SWING
- Initial capture of a flag (at start of game): +20 tickets per flag
- Fully capturing a flag from the enemy team: +60 tickets for your team, -10 tickets for theirs
FOB EXCLUSION RADIUS (Maximum distance you can place fobs from each other / build)
- Exclusion radius 400m (300m on small maps i.e Chora, Sumari, Logar)
- Build radius 150m
BLEED
- Bleed starts when both teams have at least 1 flagged captured each
- Team loses x tickets per minute.
- On odd flag layers (5/7 flag layer): -1 bleed for every flag capped past middle flag excluding itself
- On even flag layers: when you capture the enemy side middle flag -1 bleed starts and increases by -1 for every flag
- Mercy bleed is -60 tickets per minute and starts after capping the last flag (when the team controls all flags)
CAPTURE SPEED
- As of version 2.16, flag capture speed scales with the player number advantage you have in the flag.
- The minimum number of people to recapture a flag is 3 (for min speed) and the maximum (for max speed) is 8.
- Capture advantage is defined by the surplus amount of friendlies in the cap compared to the enemy team. Example: If you have five people in the flag and the enemies have one person in the flag, your advantage is 4 (5-1=4) and you will cap at the 4 speed.
- When capturing a flag for the first time in the game from neutral state (initial cap / back cap), you capture 1.33x faster than if you would recapture the flag. A one man back cap takes 220/1.33 = 165s = 2m45s.
- The slowest time to fully flip a flag (without getting stalled) as a 3 man is 360s (6m0s) and the quickest time to fully flip a flag (without getting stalled) as an 8 man is 200s (3m20s)
- The table below represents how capture speed scales (to bring the flag from capture to neutral) with the amount of player advantage in the flag:
| Player advantage | 1 | 2 | 3 | 4 | 5 | 6 | 7 | 8 |
|---|---|---|---|---|---|---|---|---|
| Time (in s) x2 for full recap | 220 | 200 | 180 | 165 | 150 | 135 | 120 | 100 |
DOUBLE NEUTRAL
When both capture points are neutralised at the same time within the same two minute window, a situation known as double neutral appears. While double neutral, it only takes three players in your capzone to recapture the point, regardless of the amount of enemies on your point. With that being said, when you are being double neutraled, the goal is to hide three players in your point in order to recapture it. Usually, you can do this without even having to engage the enemy. Some quick math:
Let’s say you and the enemy both start capturing a flag at the same time… you are capturing with 3 man advantage (180s to go neutral) and they are capturing with 8 man (100s to go neutral, another 100s to capture) advantage. The double neutral will occur and the enemy team will have an advantage in the way that they will have 20 seconds left to go on the capture while you will just be at 0% captured in the neutral state. This 20 second buffer is not much room to manoeuvre when trying to prevent the enemy from stalling your capture etc.
CHEVRONS (WORK IN PROGRESS)
- OWI magic
- Max 5 chevrons
Vanilla TC Mechanics
III) The Mechanics
Infantry Mechanics
Proning
In my opinion, Squad is a game that revolves around movement. It is very hard to move efficiently while proning and the animation to stand up is very slow. I recommend avoiding proning for extended periods of time as you are not maximising movement. Usually, if you are peeking and you get shot at, it is very easy to run away and hide/bandage - it is much harder to do this if you are proning (super easy to hit proners).
Outside of firefights, proning is effective for example if trying to avoid a vehicle or if you are trying really hard to hide to capture an objective. You can use proning to your advantage in the following ways:
Playing your kit- sneaking around enemy infantry as a HAT or engineer, or as an MG in order to use the bipodProne peeking- an unconventional peeking method
Prone jumping- dodging the shots of the enemyPlaying dead- to avoid enemies if you are alone in dire situations / avoiding enemy vehicles (looking straight down + free look)
Outside of these four elements, again, I do not recommend proning for extended periods of time during firefights. Instead I recommend crouching (sometimes) as you can still be concealed and sneaky, AND you can still efficiently move and escape.
Leaning & lean spamming
Leaning is extremely strong in Squad to peek and to modify the shape of your hit box. Leaning can be used to peek all objects and can even be used to quickly peek a hill.
(the lean here took my head just under the line of grass)
Leaning takes a big part of stamina away making it harder to shoot, this means that you cannot constantly abuse lean. It is important to manage your stamina and stop leaning sometimes to regenerate (more on this in the stamina management section). By alternating from left to right lean, you can use a technique called lean spamming which constantly modifies your hit box and makes it harder for the enemy to shoot you. This can also surprise players, making them really upset and leading to very angry posts on reddit. Lean spamming can be used to quickly repeek corners or to surprise enemies in a firefight.
I do not recommend lean spamming or QE spamming to beginner players as it is substantially harder to shoot while lean spamming compared to standing still. If anything, it is a habit or style of play and does not give you a big advantage over your enemies.
(lean spamming in a panic encounter)
Crouching & crouch spamming
Crouch running and crouch sprinting are to be avoided as it makes you a very easy target to hit. Crouching makes your hitbox much smaller and is very useful when trying to hide in foliage. For more passive players, I’d recommend crouching instead of proning in most situations. A technique called crouch spamming can be used (no tax on stamina) in order to make it harder for enemies to hit you and to try and quickly re-peek vertically (usually combined with lean) rather than around a corner.
Vaulting & crouch jumping
In a firefight, you want to be careful before vaulting as you get stuck in a long and arduous animation (with a stamina tax). When you are vaulting, you can not cancel the action, and you can not discharge your weapon making you very vulnerable. An alternative to vaulting for a lot of places on all maps is crouch jumping. Crouch jumping is done by jumping and crouching simultaneously, avoiding the vaulting animation and allows you to have your weapon ready. It is also much quicker to crouch jump. When crouch jumping is not possible you want to do short vaults over a series of small objects rather than the long overhead vault. The best solution is to avoid vaulting altogether and go the long way around.
Juking, returning fire, jump proning
When you are caught changing positions in the open, it is good practice to use various techniques in order to get into cover and/or return fire. An option could be to instantly return fire by stopping your movement and fighting the enemy on the spot (requires superior aiming skill); this can often look like a “flicking” movement. The second option would be to just keep running into cover; this can be used if the enemy is shooting from extremely far away, or if they are struggling to land their shots on you. The third option would be to “juke” your enemy’s fire by zig-zagging, leaning, crouching, spinning or jumping and proning simultaneously to execute a dive. You are juking your enemy’s fire as you manoeuvre into cover where you can then peek from. This can sound kind of funny but these drastic measures can bail you out of desperate times. Obviously, the best way to juke the enemy fire is by not getting caught in the first place. However, sometimes running in the open to urgently get into a cap point or to save a HAB is unavoidable.
Stamina management
A fundamental of being a good infantry player is stamina management. Having a decent amount of stamina is necessary for making your life easier when engaging targets. While it is possible to aim long range with no stamina, it requires a lot of experience and is not optimal. As a rule of thumb, always keep at least half a bar of stamina. The quickest way to regenerate stamina is to prone, however as mentioned in the proning section of this guide, you largely limit your ability to manoeuvre when doing so. Thus, the most efficient way to regenerate stamina is to crouch and remain stationary (1 second more than proning, so negligible) behind cover. To regenerate stamina while on the move, you want to walk (and don’t ADS). If you are about to engage in a firefight and have no stamina, it is smart to wait and regenerate stamina to at least half-bar before fighting. In order to uphold the half stamina rule, you will have to limit yourself from leaning too much (as you barely regenerate stamina whilst leaning) and from sprinting.
When transiting over long distances on foot, constantly holding the sprint key and draining your stamina bar to zero takes the same amount of time as when you only keep your stamina at half by alternating between sprinting and walking. In consequence, the most efficient way to transit long distances on foot as an infantry man is to alternate between sprinting and walking, while keeping your stamina bar at half. By doing this, you will be minimising your transit time, all while being ready to engage in a firefight at any moment.
Managing your stamina does not mean to be more passive; it means to move more efficiently.
Sprinting
Useful to get across open areas. Wait to have a full stamina bar when sprinting across an open area such as a field or a street. When you are near the enemy (imminent fight), avoid sprinting into them as it will take longer to ready your weapon for fighting.
Firemode
Fire mode is all personal preference to the player especially at medium range and close range. At medium-close range, some players opt to fire in single-fire mode as quickly as possible. Other players opt to tap fire in burst mode or full auto as in third person (i.e to the enemy), the sound of the weapon can be concealed. When tap firing in burst mode, the first burst is audible to the enemy but the remainder of the shots fired in quick succession are silent. This grants you an invisible suppressor that you can use to your advantage for a second or two of firing. When tap firing in automatic mode, the sound of your full automatic fire overlaps and makes it sound like there is more than one enemy firing. Remember that in first person this feature is not noticeable, it is only noticeable to other players around you. Generally in close quarters, you want to take advantage of Squad’s netcode and hitreg by firing as many bullets as possible (while being able to control the recoil).
(busted m4 three burst)
Bandaging and bleeding
After getting shot in the limb and even torso, you do not need to instantly bandage (if you are in a fire fight). If you take a small amount of damage and start bleeding (such as a lower limb shot), it will take two to three minutes for you to bleed out. That is more than enough time to end a firefight that is happening around you. Being too quick on bandaging will take you out of the firefight way earlier than you need to. Everything depends on the amount of health you had before getting shot and how hard you got hit by the enemy (chest shot vs lower limb shot). With more experience, you can learn when you have to bandage and when you can afford to keep fighting while bleeding.
When you are playing a kit other than medic and there is a dead player next to you, do not revive them if there is a medic in the area. Medics bandage much quicker than non-medics (nearly 2x faster to be exact). Medics should bandage fellow infantry players while fighting (when possible) to allow for the other players to keep their bandages and to keep firing. I like to always keep 1 bandage to be able to revive a medic in a tough situation. I can keep this one bandage by getting a medic to bandage me while I am fighting if I am bleeding. Obviously, this point of keeping a bandage is nullified if you are fighting around an abundance of ammo such as an ammo crate, ammo bag, or a vehicle to rearm off of.
In the current version of the game, medics are extremely strong as they can revive infantry during the firefights an infinite amount of times (if getting healed); the limiting factor to this being ammunition and the position the infantry gets downed in. Experienced players use this to their advantage by being more brave in making ambitious peeks on the enemies (knowing they will be downed in a reviveable spot if they trade or lose the fight) when in the presence of medics. Infantry should make sure to be in front of the medics, medics should make sure to be behind the infantry.
While bandaging, you can move back a fair distance and rotate in 360 degrees of freedom. This can save you from getting shot.
Avoid proning to revive a body when possible (unless you need to hide behind something). If it has not been obvious by now, I am not a proponent of proning. Proning up to a body in the open is not the way to do it. As I said, squad is a game of movement and while staying crouched you can constantly move in order to lessen the odds of getting hit by incoming fire. If you are reviving someone while crouched, it is much easier to abort the revive if you start getting shot at.
For risky revives that are in the open, it is okay to tell your teammate to give up or to wait for the firefight to be over. Experience will help you tell which bodies are reviveable and which ones aren’t. Smoke can be used to revive if enemies are far away. It is important to note that if the enemies are close (nearly standing in the smoke), they can see outlines through the smoke. Telegraphing a revive by throwing smokes should be avoided.
The sound of someone bandaging is extremely loud and gives off a huge audio queue. If someone is bandaging or reviving, it is a sign to push them. It is very easy to kill someone with their bandage out as it takes a lot of time for them to pull the rifle out. On the flipside, a technique called “bandage baiting” can be utilised using these points to trick opponents; quickly faking a bandage and then pulling your rifle out to bait enemies in the vicinity. When pushing someone that is bandaging, it is important to remain extremely cautious (but still quick enough to push them before they complete the bandage) as they could be “bandage baiting” you, or there could be a second player holding the angle.
(bandage bait)
Being quick with the map

Settings>Controls>General After playing with a lot of inexperienced players that are slow to mark things on the map I have come to the realisation that they may not be using the right map to mark things. There are three different ways to view the map in Squad: Command, Deployment, and Toggle. If you struggle with the speed at which to mark targets on the map (important to inform people in other squads/ vehicles/mortars), look into my technique for placing map markers. First, I never use the deployment menu (default “ENTER”) to mark stuff on the map, as there is a lot of clutter on the side. Toggle Map (default “M”) is used to quickly check the map; when checking the map on toggle map, it only takes up half of my screen so I can still shoot and pay attention while looking at the map. Checking the map while in combat should take maximum one second as it can be blocking critical areas of your screen. Things to look for are: the ways your friendlies are going, are you the furthest one up (everyone ahead is enemy), any markers coming up on the map? Finally, for quickly marking things on the map, use the command menu (default “CAPS LOCK”). Command menu allows you to instantly be able to control the map with your mouse and scroll in and drag/place markers. Again, this should take max one second and be a quick fluid movement during combat.
(how quick it should be)
You should not be taking your hands off your keyboard and resting back in your gamer chair to mark stuff like this guy:
Suppression
This milsim technique has its uses in normal squad play. First, it can be used to bait enemies into peeking you. If your opponent is of the mindset that he should peek you while you are shooting at his friends (the right mindset), he will peek you if you are not shooting at him. Therefore, if you know where he is and you fire a couple shots randomly at nothing, he will peek from the known position and you can be ready for him.
Secondly, suppression (extremely situational) can be used in certain situations as a way to mask audio. If you are sneaking behind an enemy, you usually want to do it while there is gunfire in the background to conceal the sounds you emit while pushing him. Ideally, you push him as he is shooting as he will not be able to hear you coming while he is shooting. You can force this concept by asking a friend to shoot at him through the wall (sound mask) while you push.
Grenades, smokes
A very versatile tool once you get good at aiming them to kill enemies that you cannot see. Try to get good at throwing them maximum range so that the enemies have less time to react when they see the grenade land. Especially useful to try and kill someone as they get revived (if you know they are reviving). You can put your frag grenade away right after pulling the pin in order to bait enemies to push you.
Smoke grenades are most commonly used defensively to screen vehicles or players holding long lanes. They tend to be very unreliable in Squad (compared to GL smokes). Depending on the angle you are looking through the handheld smoke grenades, they actually make it easier to see people (almost like a wallhack).
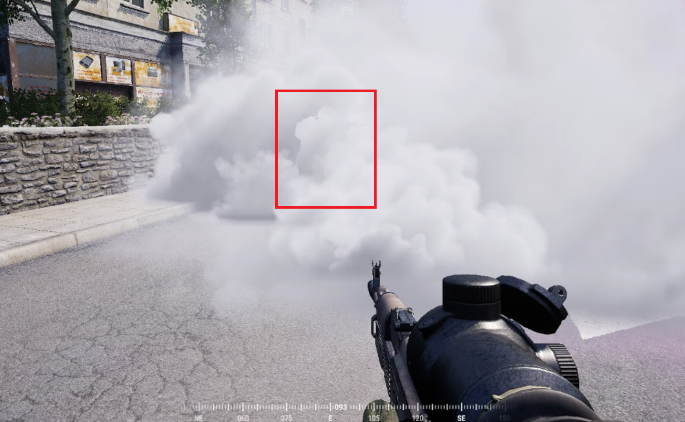 (inefficiencies of smoke in Squad)
Boosting
Can get in from spots the enemies least expect (by being creative) using the element of surprise. The downside is the vault animation.
- Boosting on a ladder or other fortification
- Boosting over a vehicle
- Boosting on a player (can peek over their head while they are standing with buddy boost for really creative angles)
Kit memory
When fighting, it is a good idea to remember the kits you are fighting against. If you notice that you are fighting a squad of five people (they give up every time all five are dead/wiped) you’ll know what to expect when they come back on their next wave. Remembering which kit/weapon killed you will allow your teammates to know if they got the revenge kill / re-frag. If you remember that you died to an MG, and a friendly player kills said MG, then you know that the person who killed you is dead. Let’s say you catch a specific kit (for example a LAT) flanking your HAB 300m away and call it out to a squad mate. Upon spawning in, your squad mate will know where to expect this LAT player. If you haven’t killed an enemy medic and your opponents are holding their give-ups, it will give you an indication that the medic is likely trying to go for the revives and that you should camp the enemy bodies in the area. Thinking about which kits you are playing against doesn’t hurt and helps you be more efficient as an infantry player.
Sound
Pay attention to sound. I usually hear people before I see them if I am holding a corner. Besides footsteps, you want to be listening for radios and rally points. If you think you heard a radio and suddenly don’t hear it anymore, it was probably a rally point that you stomped (or you’re crazy). Get good at consistently hearing the rally before you stomp it (it’s possible). Learn the different sounds that vehicles emit in order to accurately and efficiently convey the information to your team.
Know what it sounds like when an enemy gets hit vs when he gets downed. Pay attention to enemy give up yells as it means they are resetting as there could be no one in the vicinity (for experienced teams it could be bait to give you a false sense of safety).
Knowing how overpowered it is to use sound to your advantage, you must also keep in mind that the enemy will likely be using sound to their advantage. Try to incorporate audio bait and sound masking to your game. Audio bait by taking the pin off a grenade and putting it back in your inventory, faking a bandage/revive, or shooting in a different direction when you know they are just around the corner (quickly shoot in a different direction and then proceed to hold the corner as they run around it). There’s more ways to audio bait but those are some creative ideas.
As mentioned in the suppression category, sound masking is huge to help you sneak up on people or aggressively push with better odds. Someone randomly shooting in the vicinity, a grenade exploding, or mortars are all good ways to mask your footsteps and gunfire.
Mortars and Fire Support
Playing with mortars
Mortars are extremely strong in the way that a Squad Leader or Fireteam Leader can have explosive rounds hit an accurate area whenever they want. Good infantry players will use this to their advantage by calling mortars on zones where enemies are pushing and when there is a cluster of downed enemies. A cluster of downed infantry will attract medics and the mortars will either kill the medic or send the revives to the spawn screen when they get revived into mortars. Mortars can also be called in order to zone off the enemies from an objective. It is extremely important to mark priority targets for mortars and learn to use them. A universal system that I have seen most squad teams use (only to be used in organised matches/scrims) is the bike/heli system. You will never be using the bike marker anyways and it is nice and small. By using a bike marker to call mortars, FTLs and SLs can place it, unlike the fire mission request markers. Following the bike mark, the mortar players will acknowledge the request with helicopter markers to warn you of the incoming rounds (stay away from the heli markers). If you see that the bike marker is no longer valid (enemies gone), remove it.
Playing with artillery
The squad leader has to guide the commander in placing the artillery as the infantry SL has the most accurate picture of the way that the infantry is moving (paired with commander in UAV it is very strong and difficult to place a bad arty). Pointers on artillery: always use the creeping artillery instead of the static artillery. Make the artillery creep away from your team and into the enemy team, that way you can push behind it. Creeping it the wrong way will allow the enemy to revive as you are getting teamkilled by your artillery trying to figure out when to push in. Make sure to always have some sort of follow up ready to play off the artillery, whether it be a vehicle hot drop or squads pushing on foot into the objective. Another way to guide the commander for the creeping artillery is with the red arrow markers. Here is how the artillery works, try to learn it so you can more efficiently / confidently push off of an artillery: comes down 60s after calling it in, takes 50 seconds to complete 7-8 salvos
Playing with vehicles
HELP YOUR VEHICLES. Things you can do to accomplish this:
- Communicate properly to the friendly vehicle and keep them updated on vehicle movement.
- Kill the enemy LATs/HATs (they will peek when your friendly vehicle is around you)
- Switch kits to an anti-tank kit to try and track/engine a vehicle. Kill the crewmen when they come out to repair.
- If a friendly vehicle is engined around you, it can be a good idea to switch to crewman and help them repair OR be hyper-vigilant to kill the anti-tank when they peak. You want to help the vehicles get out of there as soon as possible (you can switch back to your kit after). They are worth a lot of tickets and being engined in enemy territory is dangerous.
Playing against mortars:
Mortars are annoying to play against, keep these three concepts in mind while playing against them to hopefully die a bit less to them.
Mortar rotation (especially for medics): Good mortar players use “mortar rotations” they will constantly cycle between many bike markers on the map to try and catch people reviving. Sometimes it can be 30s between rotations, sometimes even two minutes. Keep this in mind as a medic, there could always be more mortars coming. To counter the rotating mortars, pick one of two styles: rush the revive, or wait a long time. Be decisive (I prefer the first strategy).
Mortar spread: Good mortar players spread their salvos so that they are more unpredictable as they hit. It gives you the feeling that the rounds are following you or that they are randomly hitting in a large spread. Bad mortar players don’t use this (they constantly hit a small spread in the same predictable location). Learn to recognize it quickly in order to know how to move through the mortars.
Mortar sound: You can hear/see when you are about to be mortared by looking at the sky and listening to the distinct sound the round makes before it hits you. By getting into the habit of doing this while rounds are already landing and spreading around you, reacting quickly could save you from getting mortared.
Extra notes on fire support
Following UAV cool downs, always make sure to check the sky sometimes to see when the UAV is up. Communicate this to the friendly vehicles so that they kill it as soon as possible. This takes 0.5s to do and will immensely help minimise enemy UAV up time. This tip is sweaty and should only be applied to organised play.
When a helicopter is flying slowly or hovering around you, it is easy to disable it with small arms. It takes two mags of a basic infantry rifle into the tail rotor to send it into a spin and disable the helicopter. Later, follow up can be organised to kill the helicopter such as a vehicle ram, vehicle kill, mortars, or LAT.
IV) The Brain
Initiative
An infantry player with good game sense will always be taking initiative - it wins games. A lot of inexperienced players fail to check their map, and another bunch check their map and are aware of the situation but still fail to take initiative. Below are some examples of taking initiative.
Switching kits:A grenadier switching to the second LAT while your HAB is getting farmed by a vehicle. A rifleman switching to grenadier when a lot of the enemy is playing from windows.Riflemen providing ammo:When playing their kit properly, the rifleman will run to the LAT before they start engaging vehicles so they can swiftly provide ammo for a second shot. They will take initiative to provide ammo to the squad leader for another rally point after placing it… they will keep the SL updated on how much more ammo there is left so they know how safe to place the rally point.Stepping into the cap when you are near it:Don’t stand 1 cm from the flag, especially when a maximum cap speed is required. Don’t run off the flag when you know you are / could be the third person in the flag.Going back for a HAB when it is blocked:Making sure that you are not underreacting or overreacting to do the retake. Rule of thumb is that the closest players will go back for it (it is your job to realise you are the closest player).Going for a rally stomponce you know where it is (without giving your push away by shooting enemies)Assisting a vehicle:Assist your vehicle by switching to LAT off of them during a vic fight, giving accurate information about what the vehicle is doing, switching to crewman off of them to help repair quicker to move away.- Offering to bring a logistics truck to create an attack FOB at an opportune moment
- Pulling supplies back into logi before FOB dies (if you’re right next to logi)
- And much much more
Performance Indicators
During the game
In order to keep track of which kills are giving up, make it a habit to check the scoreboard everytime you die. Once you give up, your teamwork score will update and this will give you a bit of information. The only important things to know here are that you get +10 score for a down that gave up and -1 score for when you give up. Keep in mind your score can sometimes be affected by things such as reviving, healing, logistics, killing vehicles etc., but it is extremely viable to track the tendency of your score. Let’s say you are a simple rifleman and you downed about seven people in that first life. Fast forward a couple of minutes where you give up and your score changes from 0 to -1. You can be certain that those people you downed did not give up and probably got revived… or else you would have about a 69 score. This information can help you track that squad.
Below is an example from a scrim (scoreboard before first death vs after first death). You can see that after I gave up my score went from 0 to 42 meaning I killed approximately four people (they gave up).

After the game
Compare your KD Ratio and revives to the rest of your squad, rest of the team, and opponent to get a good idea of how you did score-wise. Reflect on if you contributed to any vehicle kills, FOB takes, flag takes. Did you kill a combat engineer with a 360 noscope right before he C4ed your radio? That is worth a lot more than a pretty KD ratio. You can usually figure out what squad you were fighting in your lane when the squad KDs are approximately inverted from each other. Did you play the flag much relative to other players if you were assigned to play the flag? Flag score equates to 10 points per 5 seconds and you can get a good picture of who was playing on the flag by looking at flag score at the end of the game. You generate flag score by capturing or defending an active flag.
Above all this, the best way to have an indication of your performance is to review your own VODs. Record your gameplay and go over every kill, death, and other key moments. What could you have done better? At the end, note solutions to all your problems.
How to Improve Infantry Game Sense and Become More Versatile
To conclude, I will give my personal opinion on how to train up an inexperienced player to their maximum potential game sense. Reading a guide does not do anything to help compared to actually playing the game and actively learning from your mistakes. I recommend doing the following things in order (move onto the next step once confidence/satisfaction is achieved):
- Learn how to medic
(ironsight medic)- ironsight medic so that you are not focused on killing as much. Only focus on properly following the fundamentals mentioned in the kits section, you do not need an optic to refrag. - Learn how to use ironsight with an
ironsight LATor rifleman (only in pubs of course) - learn to fight with the iron sight / red dot, etc. A lot of inexperienced players use the optic as a crutch to make up for their terrible positioning. Trust me, your positioning will improve if you do this step properly. Another benefit of this will be training to use your kit (frag rockets to get hard to reach enemies, learn how to engine vehicles, etc.). - Learn how to use the
optic kits- you have now practised your positioning by letting your game sense do the work and getting proper positioning. Practice the gunplay adjustments that come with using an optic. The goal here is to have the optic amplify your skill and not make up for it. - Learn how to
squad lead in pubs(without fobs, with fobs) - practice what was mentioned in the SL section. Practice many rounds with only a rally point (ignore placing radios for now). You want to be focusing on 100% rally uptime. After mastering the art of rally points, practice properly placing FOBs and HABs, keeping your logi ready with supplies to constantly develop spawns for your team. Don’t blame the other squad leaders, it’s a pub game and it’s expected. Aim to carry your team. - Learn how to use all the
firesupport / specialistkits (specifically LAT, GL, MG) - as per kit section and common sense - Learn how to
squad lead in organised play- all around higher stakes, more of an accent on rollouts and mid game decision making - Learn how to play
mortars, commander, vehicles - Make
strategies
tl;dr I feel like every squad player should know how to properly squad lead and play medic before going on to main a specific kit.
For the experienced player, I recommend constantly going back and trying new roles (pushing out of your comfort zone) with the aim of improving game sense and general knowledge of the game.